Showing posts with label unit pocket. Show all posts

Sunday, February 2, 2014

Celebrating a Year in Blogging!! My Workshop Presentation at the Math and Science Symposium

A year ago today, I began sharing my experience with journaling and education. I have been given the privilege of giving another presentation at the Math and Science Symposium.

I wanted to share the material I presented. I selected several foldables by other bloggers to show that the material I use daily doesn't come from just me. My top Algebra resource is Math=Love.

I'm really proud of myself. Over this past year I have prepped more of my foldables and notes on the computer to cut time in class and presentations.

I have uploaded all but one of the pieces to as a PDF to my google drive. This google drive is shared with the public. It has the PDFs from not only my presentation but also almost everything else I have put together with my computer-bathroom passes, syllabi, journal notes, Spencer Henry Behavioral Management, etc.

I like to start classroom journals and presentations with a tangram puzzle.

All journals and presentations also include what I call a reference pocket on the inside left cover. This is where reference charts for standardized testing, calculator guides, etc. are kept. For presentations, this is where I place my "Journal Wizard" brochure.

Next thing that comes up in journals is a "Unit Pocket" that procedes a definite section of material. I also use journals for professional development.

The next page presented showed how a general page appears in our journals.

The left side is used for two main parts-lesson frame/objective and critical writing/reflection. This has been something I have been striving to complete in journaling. Providing students with a direct objective and incorporating writing and reflections. I'm still struggling to make this a routine in my daily teachings.

I use the right side for the lessons, foldables, assignments, etc. There are other methods suggested such as putting the writing on the left and the lesson material on the right.

I found it very beneficial this year to go over sets of real numbers. This is not a concept that is directly assessed on any standardized testing, but it is apart of the language that is used and seen.

I have seen and used a Venn diagram format in the past, but I really like to do a flip style foldable to make this concept more interactive. Math=Love has a printable format without the flaps.


It's not prefected but it is a start.

Next page: Function Machine

I find it very important to demonstrate what a function is when refered to as a machine.

I use this Youtube video "Meat-A-Morphosis" to introduce functions. The kids get a kick out of it!

I tried to put the idea of a function machine into a pull tab foldable.

Then pull the green tab down to demonstrate the input of six and the ouput result.

Next up is a foldable that I spent hours trying to get the shape placement right. It is still not perfect, but demonstrates the relationship between the most popular quadrilaterals. The only one that I couldn't work in was a rhombus even though a square is a rhombus. This foldable can make a square, rectangle, right angle trapezoid, isosceles trapezoid, and parallelogram. If you would like a copy in Word to perfect the arrangement, send me an email and I'll send you a copy. Just be sure to share it back. :)

The next foldable is a steal from Math=Love. I typed it up completely to progress the pace of my presentation and provide a quick reference for Algebra 2 students. I can share this by email also so it can be edited.

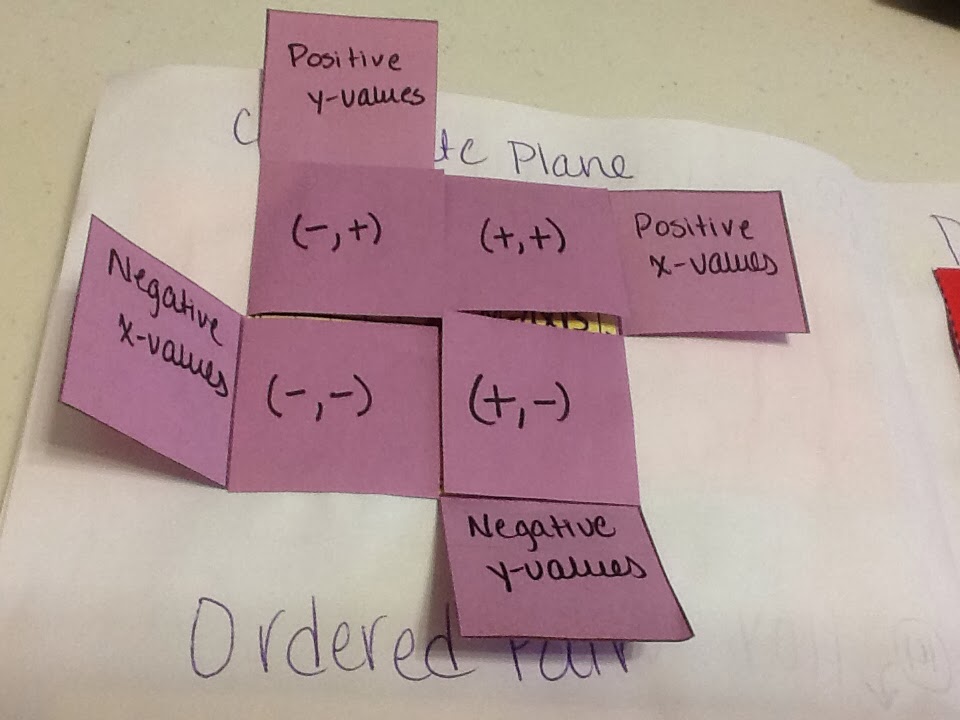
I love this foldable on the Coordinate Plane. I adapted an idea from Region 15 consultant Marifrances and Math=Love posted a template for it. This can be created without a template by first cutting a square, second folding into sixteen squares, third cutting off each corner, and fourth cutting the two squares around the edge into two flaps.

The next foldable is for ordered pairs. I would look on Math=Love for a better illustration of how she taught and used it. I haven't used this in class yet and I ran out of time for my presentation.

Next up, Domain and Range. This is quickly becoming my new favorite thing to teach. Domain and Range was one concept that I didn't get until I started teaching. I struggled through college and had no idea what it was in high school.

I borrowed this acronym from Math=Love and turned it into a similar foldable as HOY VUX.

I pair this foldable that defines Domain and Range with one that is used as a tool for identifying the Domain and Range of a graph.

We use highlighters to identify the domain and range. This foldable is an amazing tool that helps kids understand and relate that domain is the vertical boundaries identified by the values of a horizontal axis and vice versa for range.

Thank you for your time! Share thoughts and comments!! It's been a wonderful year and still psyched to keep sharing.


Sunday, September 1, 2013

My First Week of School... slower than expected

I had my first several weeks of notes and assignments all planned out. I guess I thought it could be taught in one week.

It did not go as planned! (It never does.)

I used the "First Day of School" tangram for all my classes. It was a great way to determine the pace at which a class or student cuts, folds, and pastes things together. The pace of my previously taught classes is significantly more efficient than that of my new students.

The great thing about doing the reference chart on day one is that my students immediately use it without being reminded to. In Pre-Algebra, we began the year with a review of Geometry Formulas. I was concerned at first, but realized that this was a great review of basic algebra skills with something they were familiar with. And it was another way to bridge the arithmetic skills from by hand to calculator.

Every class then created a Unit Pocket for the first unit.

In Algebra 2, we started with Sets of Real Numbers. I reference the textbook partly for my information and loved the example they used-billiard balls.
For the sets and subsets of rational numbers I printed a concentric rectangles to give the look and feel of a Venn diagram. My original strategy was to teach rational numbers first and work towards natural, but my colleague suggested and explained how she teaches natural numbers first and works out towards rational. It made complete sense and it worked my kids!!
For Geometry, I have followed the original pages from older posts, but decided to add this page to clarify what happens to triangles in the different types of geometry.

This year for Taxi Cab geometry, I used google earth to show students where it originated-New York. For small town kids, this was an adventure. We then used google earth to find our small town, overlayed a sheet of posterboard on the Promethean, and tried to find the shortest route from school to the Snow Cone truck. Taxi Cab geometry was just about everyone's favorite.


Sunday, July 21, 2013

Geometry: Polygons and Angles in Regular Polygons,

I heavily relied on the CSCOPE curriculum, End of Course prep book, and online resources to guide me through this unit. This is my first year to get this far journal wise and thoroughly teach properties of two dimensional figures.

Pg 1. Unit 7 Properties of Two Dimensional Figures

When I get the whole Youtube thing figured out, I will try and share some paper-folding lessons I've learned in workshops and used in my classroom. They strongly support the unit on two dimensional figures and they are fun!!

Pg 2. Polygons

This is an unusual foldable, but I love how it organizes the concepts I'm trying to get over to my students. It's folded into fourths. The right side is folded two times into itself and the the left flap folds over top to the right. (Sorry if this explanation is terribly confusing; hopefully the pictures make more since.)

Again, there's some gray area as far as complex polygons go, and I informed my students as such. Any opinions or suggested resources, please share.

Next year, I plan to use color to compare corresponding categories.
Complex vs Simple
Concave vs Convex
Irregular vs Regular

Pg 3. Angles in Regular Polygons

I enjoy teaching this lesson because students need multiple ways to determine angles and experience deriving the formulas from building patterns.

We started with a large polygon on the front and illustrated what is considered the interior and exterior angle. Next, I asked them to make a conclusion based on what they know. They concluded that the interior and exterior angles are supplementary! We added that statement to the top. We then went to the inside and completed the gigantic table to derive the formulas. We finished by writing the important formulas and ideas on the front inside the large polygon.

Students struggled with remembering the formula for the measure of an interior angle. They found another way - determine the measure of an exterior angle (easy), and subtract the measure of exterior angle from 180 to determine the measure of the interior angle. A much longer process (to me), but I was so excited that they could figured an interior angle measure out based on concrete prior knowledge.