Showing posts with label solving. Show all posts

Saturday, July 20, 2013

Geometry: Special Right Triangles

Pg 10. Rationalize Square Roots

Before we dived into Special Right Triangles, I though we'd go over rationalizing square roots. This went much smoother this year than in the past because my students were familiar and comfortable with square roots and simplifying them. Surprisingly, most of the students took this very well and rationalized square roots like it was nothing! (Still amazed!) It has been such a struggle in the past.


Pg 11. Special Right Triangles

This has always been my toughest area to teach to my students, until this year. When it was all said and done, I confessed to my students that this is one of the hardest concepts/lessons for me to teach. Then, they blew my mind. My students told me this was the easiest thing they've done so far and loved it. Throughout the rest of the year they chose to use the special right triangles method to solve most other problems over trigonometry!!

I think that part of reason for this is the method I used to teach this concept. I pulled several resources for notes, guided practice, and independent practice. I worked all problems myself to identify a pattern to the differing levelss of questioning. After this, I taught each question type as a lesson by itself.

For 45-45-90, I focused on finding the legs first and then the hypotenuse.

For 30-60-90, I began with the questions that required simple mathematical relationships in order to solve and then we worked up to the questions involving rationalizing.

We would work out an example with extensive explanations, then complete a student let guided practice. For the independent practice, I encouraged them to work as a team and I graded them immediately. I actively monitored for independent and collaborative work and I made sure to intervene when I saw attempted cheating.

Special Right Triangles

Cover:

Deriving the formulas:

Lesson examples:
Guided Practices: These were folded and tucked behind the above notes that were glued down like a pocket.
For each question, you'll notice a select number of homework problems. I assigned what my students thought was randomly selected problems. I would assign a small two to three problem practice and then the next day come back and do one to two more or the same. In the end, we completed the worksheet.

Honestly this whole journal page probably took us four or five days to complete. We looped through lesson, guided practice, and independent practice for each type of question. I felt that this was an important tool needed later for properties and measurement of two and three dimensional shapes.

Usually, the lesson using trigonometry to solve right triangles is introduced here. However, this lesson hit right before Christmas break. I looked through upcoming units and decided that I could make up the lessons and concept in Unit 8 Measurement of Two Dimensional Figures. It turned out great! Not sure if I will keep it this way next year or not. I guess it depends on timing.

This is a page from my second year journal.

Optional Pg. Right Triangle Solving Strategies

This foldable was used after the lessons on Trigonometry to summarize the strategies used to solve right triangles.


Monday, July 1, 2013

Geometry: Applying Parallel Lines, Transversals, and Special Angle Pairs with a Mini Flip Book

Pg 4. Over the past three years, I have approached these theorems/postulates in different ways.

First attempt: Completed a worksheet and summarized our findings as seen below.

Second attempt:

We completed two flip books with sentence strips that the students had to match the if statement to the then statement and to the diagram.


Third attempt:

Within a large flip book project, we wrote the postulates/theorems out along with each converse.

For the large flip book project, students were to google an image that they could illustrate parallel lines and a transversal on.

INTERESTING: Students brought up the interesting difference between parallel in the real world versus the result of a two dimensional image. For example, one student wanted to use an image of railroad tracks knowing that they were parallel in the real world. However, another student pointed out that when viewed on a two dimensional service the tracks appeared to intersect at the perspective point. Is the picture a valid option? After this discussion, I had students justify their chosen image. How did the idea of parallel apply?

Next, they labeled the angles and identified the special angle relationships.

This had some interesting results. I had the students make up some algebra problems, solve and check them, and then exchange with a partner. Some of the results the students would makeup would have infinite solutions, no solution, and result in negative angle measures.

Here are the postulates/theorems and converses.


Out of all that I teach in Geometry, this is one of the hardest concepts to get my students to understand. Proving lines paralell or angles congruent. It took me two years to see the pattern. Maybe next year I will be able to present it better.


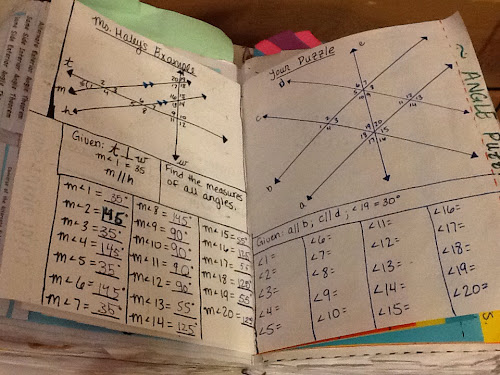
I gave students two angle puzzles to complete. We discussed every detail and justified each strategy used. Next, students were to create their own angle puzzles for homework. The next day, I mixed up each puzzle and passed them out to the class. Great idea, but kind of overwhelming. Students could critique and troubleshoot each others puzzles, but some would use incorrect properties and their answers wouldn't work out. This activity requires quite a bit of time and would probably do better if the students work with a partner.


Saturday, March 30, 2013

My Tool for Finding Slope & Slope Scrabble

Before our test, I decided to review finding slope with the two methods we had studied.

1. Counting Slope on a Graph

2. Slope Formula

Several of my Geometry students used a method earlier in the year that I thought Algebra 1 might appreciate.

  • Positive: rise over run
  • Negative: fall over crawl


We also discussed the staircase within a staircase.

Then we moved over to the slope formula. We also discussed the relationship between coordinate values and slope values of horizontal and vertical lines.


SLOPE SCRABBLE! Not as exciting as it sounds right now. We tried this but it was difficult to get the idea across to my students.

They had an excellent time finding slope for all of the problems cards I gave them. I even set up a table with all the solutions laid out so that they could match them.

The idea of slope scrabble is to begin at the origin and, using slope, make your way to the far blue dot in the corner to win. All of the other dots are things like double your slope, draw again, etc. There was some success with my students that have to patience to solve puzzles. Other students wanted to match slope again.

My students have an excellent understanding of slope.

I just wish I could troubleshoot the process and get this game going for them.


Solving Equations is Like Wrapping Presents!

For my first year of teaching Algebra 1, I have made a lot of mistakes. These mistakes all revolve around an assumption. I assume that my students already know this and that. This comes from my experience in state testing remediation for 11th graders for the past three years. I now have realized that I have a chance to teach students to understand Algebra 1 from the beginning. I decided to review solving equations with my students, since this was a nightmare at the beginning of the year. I decided to teach them to understand each component of the process and what solving meant.

Step 1: "Unwrapping Your Solution"

I love reading educational material and Danika McKellar is one of my preferred authors. I remember her referencing gift-wrapping as a metaphor for solving equations. The idea of operations applied to a solution is similar to wrapping an object to hide its identity. To reveal the item, one has to reverse the process of wrapping, which is similar to finding a solution by reversing the applied operations.

It didn't turn out as spectacular as I would have preferred. However, this was a day well spent because my students no longer feared equations (for the most part).

First we started with x=3. Next, the students selected different operations and values to "wrap it up". Then in order to solve we reversed to process. When finished, we a concluded that solving is reversing the original operations. Hooray!!


Step 2: Properties Used to Solve

We identified the most common properties used in solving equations. Within the notes, we used the same equation to demonstrate how similar operations can be applied to acquire the desired result.

Step 3: How to Solve Those Equations

With the use of multi-door flap foldables, students identified each step in solving an equation by technical property and then by general vocabulary accumulated by the class. This step was critical in building their fluency in solving equations. Even lower level students that were hesitant in the process could solve.

Example1: We always started with the inside process.

Then finish by summing up with general words to help them identify the steps.

Example 2:

Step 4:
We moved from the in-depth process to identifying the general steps. By now, my students were using the vocabulary-properties, names of terms, quick steps, etc.

Step 5:

We reviewed with the giant Sorry board game. During this step, students started with a given equation including the solution and focused on the solving process.

Step 6:

TEST: I gave them a test in standardized format and received outstanding results! :)