Pg 1. Unit 4: Triangles
Pg 2. Classification of Triangles
Pg 3. Triangle Basics
ACTIVITY: I learned a great activity involving Anglegs for exploring types of triangles and the Triangle Angle Sum.
I use Anglegs for exploring polygons also. These are an excellent tool to provide students with a hands-on exploration and confirmation of understanding.
I had students draw their own triangle. We started with identifying the critical attributes. We then measured the length of the sides and degree of each angle. We talked about what the sum of the three angles should be and why would some of our measures vary. This led the discussion to the importance of precision. Lastly, we classified our own triangles and justified the classification orally. This will be written next year.
Pg 4. Special Segments of Triangles
PAPER FOLDING!!! Paper folding is a powerful tool in mathematics. I use it some in Algebra and mostly in Geometry. I'm looking for more, so if you know of some, tell me please!!!
We all started with a similar triangle (scalene acute triangle) in my first year teaching this lesson because I was unsure how students would react to the results of a right, isosceles, equilateral, and obtuse.
We labeled each vertex A, B, and C.
TIP: Have students use a ruler when creasing. This will help with accuracy.
Median: First locate the base, then fold in half and pinch to identify the midpoint. Using a straight edge, connect the opposite vertex to the midpoint.
Perpendicular Bisector: Fold the base in half again making sure that the base is lined up and crease. This fold and crease is important because it creates a corner/right angle. When unfolded, use a straight edge to trace the fold that shows a perpendicular line to the base through the midpoint.
Altitude: Students now know how to fold a right angle. The discussion approaches the strategy of how to fold a corner/right angle that will go through the vertex. This is the toughest one to fold and is usually not accurately done. I tell my students to do the best they can. Success is usually achieved when using a ruler.
Angle Bisector: If an angle bisector exists exactly half way between the two sides of an angle, then how do we fold? Students pick this on up quickly, but get the fold mixed up with the fold of a median. You fold the two sides on top of each other and crease.
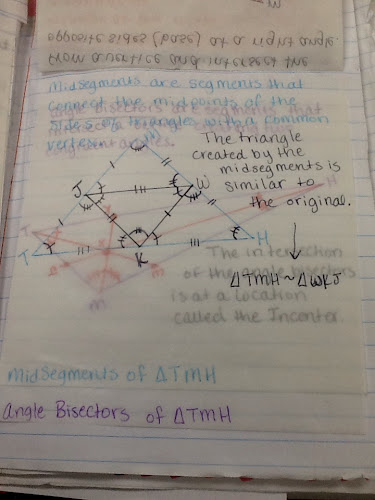
OPTIONAL: Midsegment: I have students fold and pinch the midpoints of the other two bases and then use a straight edge to connect them for a midsegment.
Definitions: (Written on the back.) These can be done before or after each segment is constructed. I have done this both ways. Definitions done before allows students to determine how to fold the triangle to meet the definition. Definitions done after requires students to derive a definition based on the critical attributes used to create the segment.
NOTE TO SELF: However, after experiencing this again in a workshop, I would cut out all types of triangles and mark, with a dot, the base a student will use to view their triangle. After folding all special line segments, the presenter asked which participants only had a certain number of folds instead of all four/five different folds. These people would hold up their triangles and we would explain why that happened. This required us to connect the characteristics of the triangle to the type of triangle.
Patty Paper is easier for students to use to line up sides for creasing.


